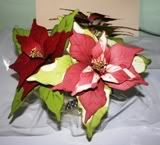
Poinsettia Bouquet Instructions
Supplies Needed:
MemoryWorks Products:
--Red and Green Pattern Paper of choice and/or Cardstock
(I used Prism Cardstock in Blush Red Dark and Intense Kiwi for the flower in the instructions)
--Ranger Ink Distress Ink in Fired Brick and Peeled Paint
--Zip Dry Glue
--Scissors
Non-MemoryWorks Products:
--20- and 24-gauge Floral Wire (optional: 28-gauge Floral Wire for wrapping petals to stem)
--2 Stamens (found in floral department)
--Floral Tape (Green)
--Styrofoam Block (to fit basket)
--Basket of choice (or you can make a basket like I did using Pattern Paper and/or Cardstock)
--Wire Cutters
--Pencil and Eraser
Optional:
--Clear Marbles (found in floral department)
--Spanish Moss (found in floral department)
--Cellophane Wrap
Note: I made these flowers from a pattern I have for Plastic Canvas. (back cover lower right corner: Poinsettia made in Plastic Canvas). This goes to show that you can use any pattern for papercrafting.
Front Cover

Back Cover

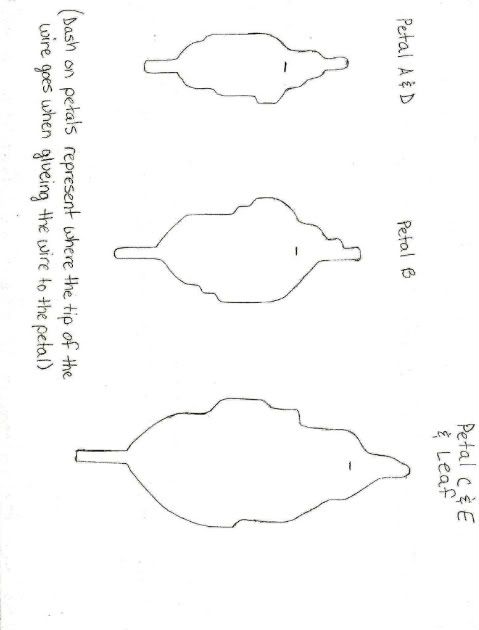
Petals and Leaf Patterns

Step 1: Gather supplies and cut out patterns.

Step 2: Using a pencil, trace petal and leaf patterns on back side of paper/cardstock. For small flower, you will need 3 A petals, 5 B petals, and 4 leaves.
Step 3: Cut out all petals and leaves. Run an eraser over edges to erase any pencil marks that are left.
Step 4: Cut a 6” piece of 24-gauge floral wire for each petal and leaf.
Step 5: Glue 6” piece of floral wire to back side of each petal and leaf. (Note on pattern: dash/line on petal and leaf patterns indicates where the end of the wire should be placed.)

Be sure to press wire into glue.
Step 6: While the glue dries, make a stem by attaching 2 stamens to 20-gauge floral wire. To do this, cut 20-gauge floral wire into 9” piece. Take the 2 stamens and place 9” piece of wire between them.

Twist stamens wires around the 9” piece of floral wire. (Or use a small piece of 28-gauge floral wire to wrap around stamens.)


Starting at the top of the wire and bottom of stamens, wrap floral tape around stamen wires.

Wrap twisted wires with floral tape and cut off tape.

Step 7: Once glue is dry and wires are attached securely to petals, ink edges of petals and leaves.

Step 8: (Optional) for a more realistic look, use the edge of ink pad to draw lines on petals and leaves for veins.


Step 9: Bend/curl petals to shape. (You can do it as you add the petals to the stem.)

Step 10: Now to start assembling the flower. For the small flower, place the 3 A petals around the bottom of stamens.

Step 11: Starting under the petals, wrap wires with floral tape. (Optional: use a small piece of 28-gauge floral wire to wrap around petals and leaves. Then wrap with floral tape.)

Wrap tape the whole length of the petal wires. Break off tape.
Step 12: Place 5 B petals around stem about ¼” below the bottom of the A petals on the wire stem.

Step 13: Starting under petals, wrap wires with floral tape the whole length of the petal wires.

Break off tape.
Step 14: Place 4 leaves around stem about ¼” below bottom of the B petals on the wire stem.

Step 15: Repeat step 13.

Wrap tape all the way down the stem (to the bottom of the stem). Break off tape.
Step 16: Bend petals and leaves to shape as desired. (before I placed flower in basket, I bent/folded over the stem wire upwards.)

Step 17: For larger flower, repeat steps 1 – 9. (For step 2, you will need 3 A petals, 5 B petals, 3 C petals, 3 D petals, 3 E petals, and 4 leaves.)(Each of the different sized petals can be done using different paper like I did with my bouquet. If using cardstock, you would need 6 A petals, 5 B petals, 6 C petals, and 4 leaves.)
Step 18: Assembling the large flower, repeat steps 10 – 13 for assembling small flower.
Step 19: Place 3 C petals ¼” below B petals and wrap with floral tape.
Step 20: Repeat step 19 two more times by placing 3 D petals and then 3 E petals on the stem.
Step 21: Repeat steps 14 – 16.
You can make an arrangement out of these by placing a Styrofoam block in a basket and cover it with Spanish Moss before placing flowers in basket. For my arrangement, I used a template to make a basket out of patterned paper and cardstock. I took a piece of cellophane wrap and placed it in the basket. I placed the Styrofoam block in the middle of the wrap and placed clear marbles (found in floral department) in the wrap around the Styrofoam. This hides the Styrofoam and adds some stability to the basket/arrangement. I tied a ribbon around cellophane wrap (be sure to leave a small opening for flowers to go in). I then placed my flowers in the basket and arranged and shaped flowers as desired.


There you have it. It can be tricky when trying to hold the petals onto the wire stem as you wrap with the floral tape. I would hold them on there the best I could and wrap with the tape. Once I have them taped to the stem, then I move the petals around better on the stem. So I wish you best of luck in making these flowers and if you have any questions, feel free to ask.
Happy Scrappin'!

No comments:
Post a Comment